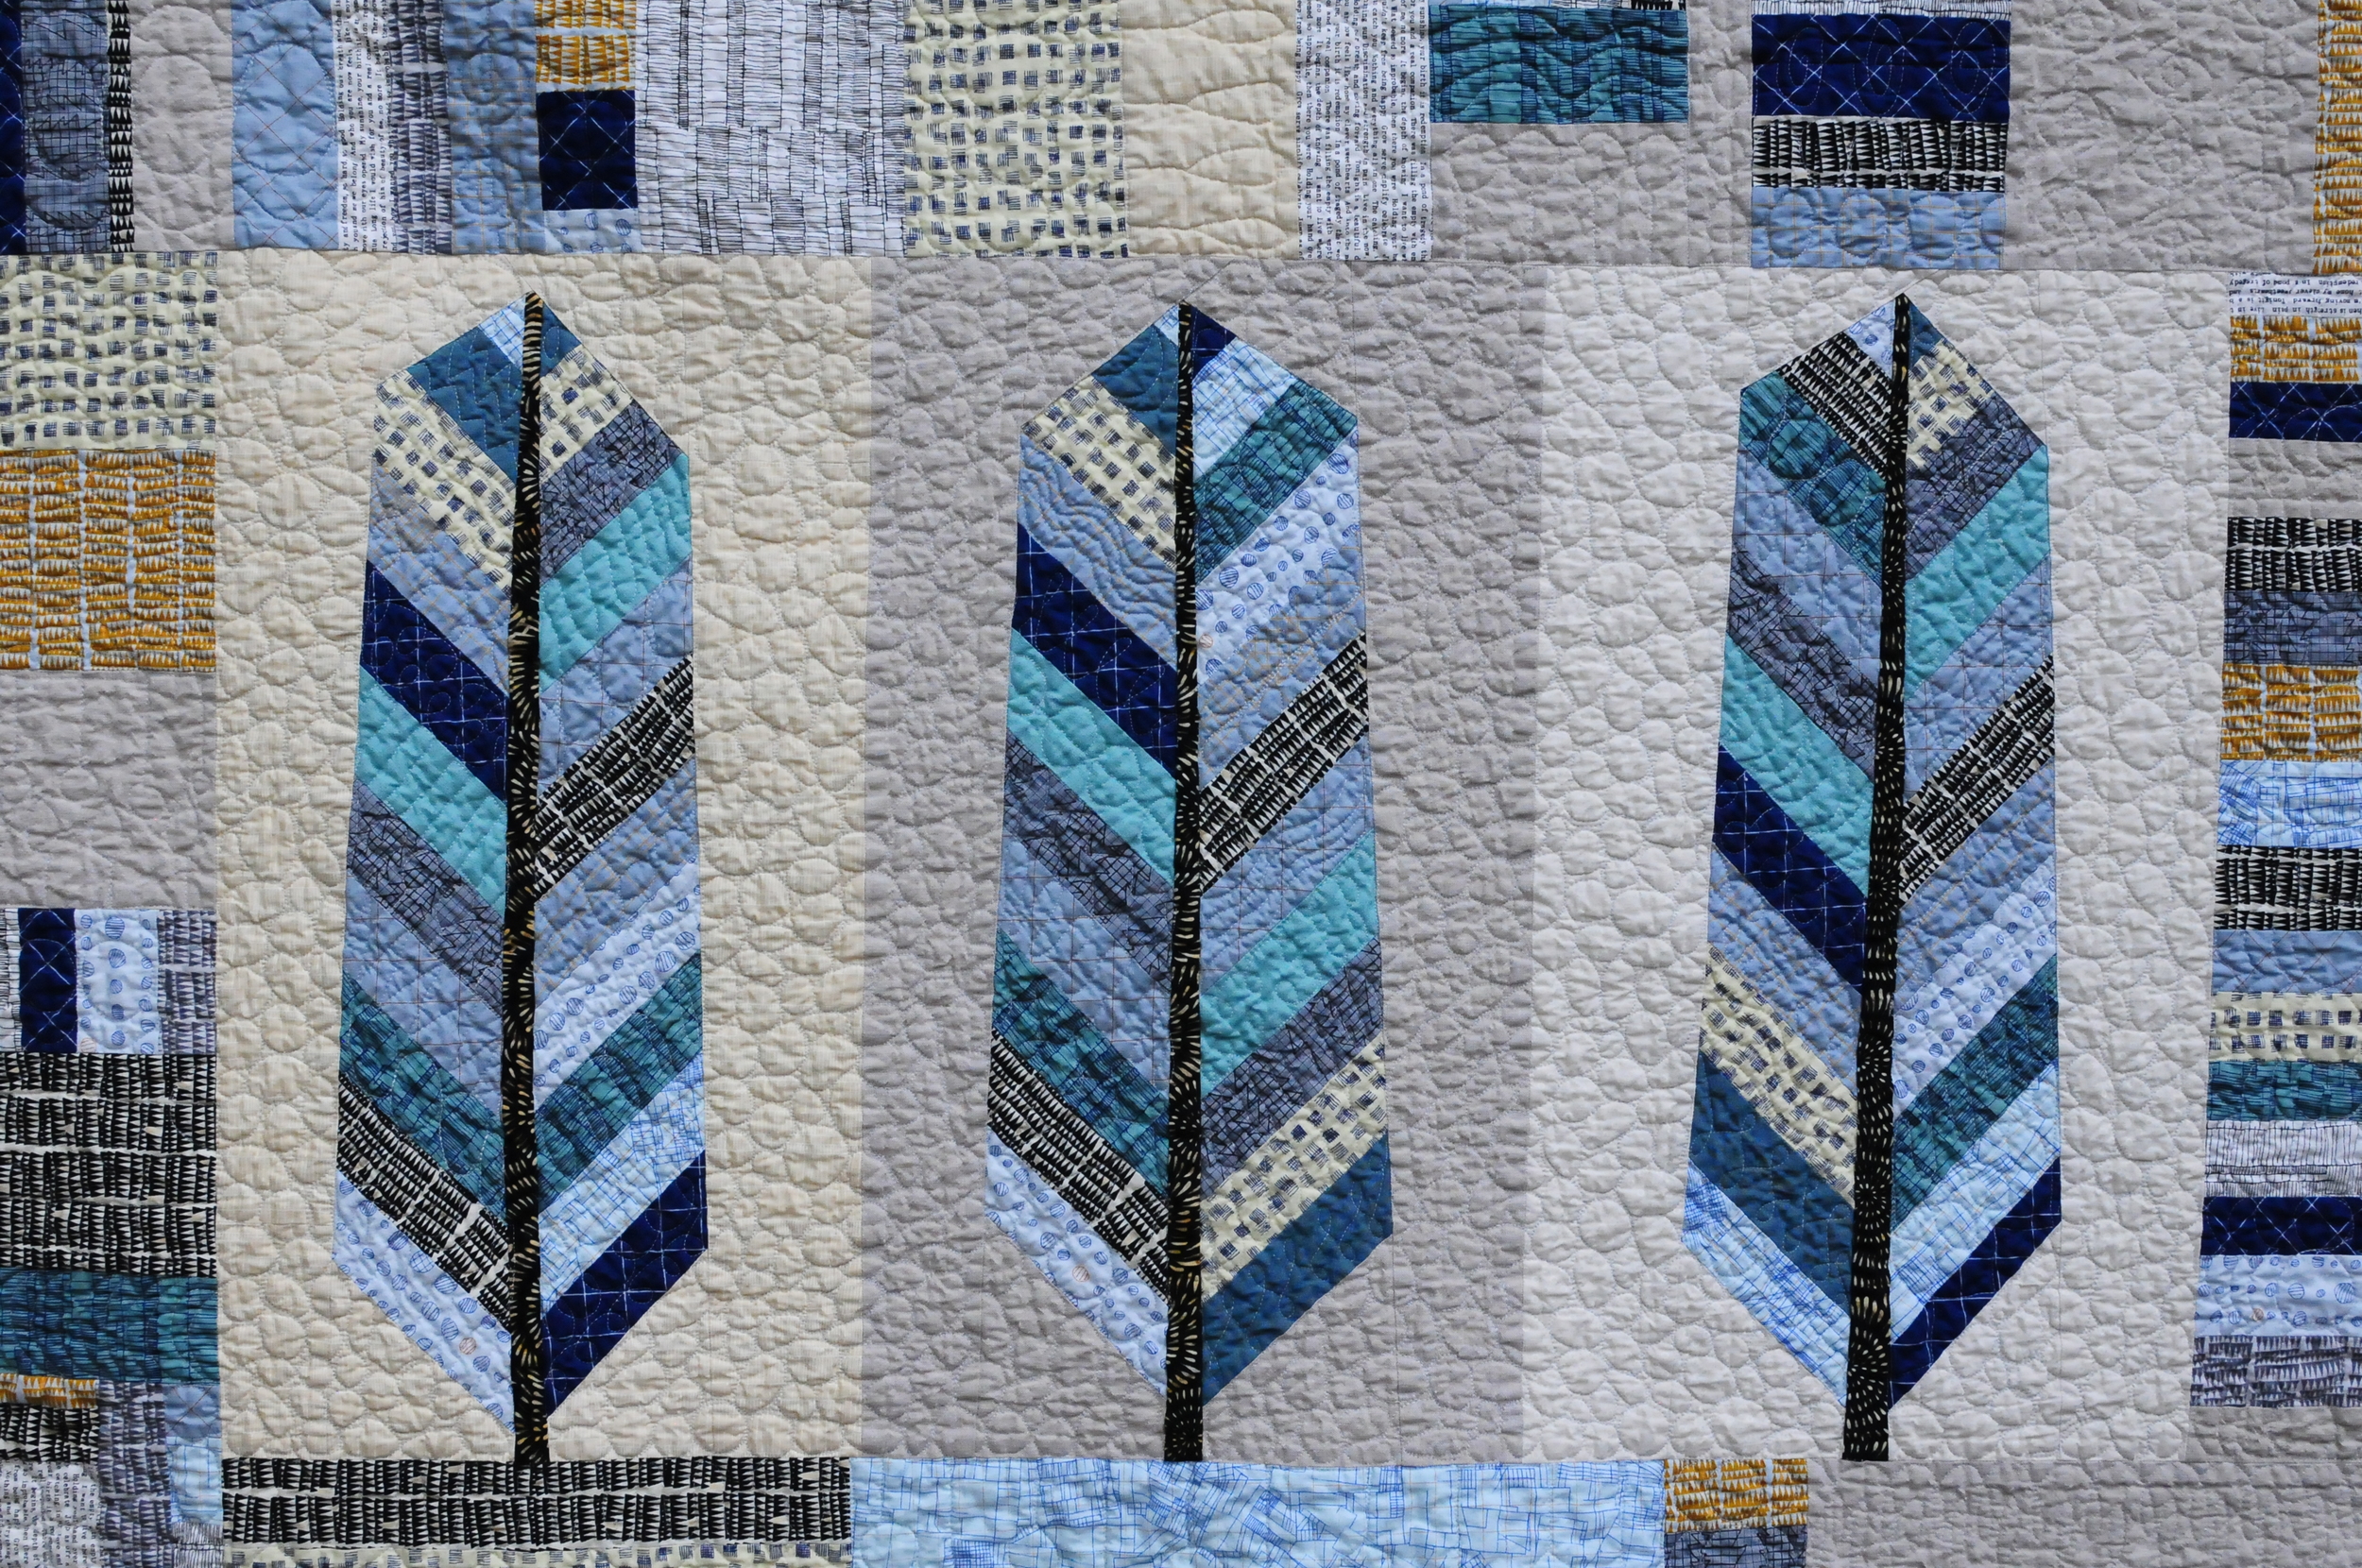
Last month when I showed the photos of Chloe's graduation quilt, Wings to Fly, I suggested that I'd have more to say about feathers at a later date. Well, today's the day! I have found these feathers to be pretty easy to do, especially if you are already familiar with improv techniques. Even if this is your first improv, I hope you will give this a try and let me know if you do. Please leave a comment if anything is unclear and I will do my best to explain better.
For the following tutorial I am using fabrics sent to me by Heidi Parkes. I discovered Heidi on Instagram about 7 months ago because she had a contest where people could post photos of a quilt they love. Tamara King happened to post a photo of my quilt Plain and Fancy for the contest and I had no idea until I had my name linked to Heidi's post. She was very kind to send a stack of fabric to me as well as Tamara! I plan to make some more of these feathers to use in a quilt to donate to my guild's community quilts program so the gift just keeps on giving.
I am also writing this tutorial for members of my Central Oregon Modern Quilt Guild's QuiltCon Charity Quilt project. This year the charity quilt has a certain color palette, must be made collaboratively and must be made with intentional improv. The feathers seemed like the perfect thing for this project. Click here to read more about the QuiltCon Member Charity Challenge.
So, here we go! COMQG members will be getting packets of fabric to make their blocks, so my instructions refer to that. Words will be below the photo they refer to.
Please read all the way through before sewing and/or practice on scrap fabric if this is new to you.

*** I am using a 1/4" foot, but my seams are not necessarily exact. This is another of the lovely reasons to do improv piecing!
*** It is extremely important to use a small stitch length with improv piecing. You will be cutting across seams on a regular basis and you want your seams to be strong! I change mine to 2.0.
COMQG members- you have received a packet of fabric with colored rectangles for your feather vanes, a black strip for the feather shaft, two large background rectangles, one small background square and one larger background square.
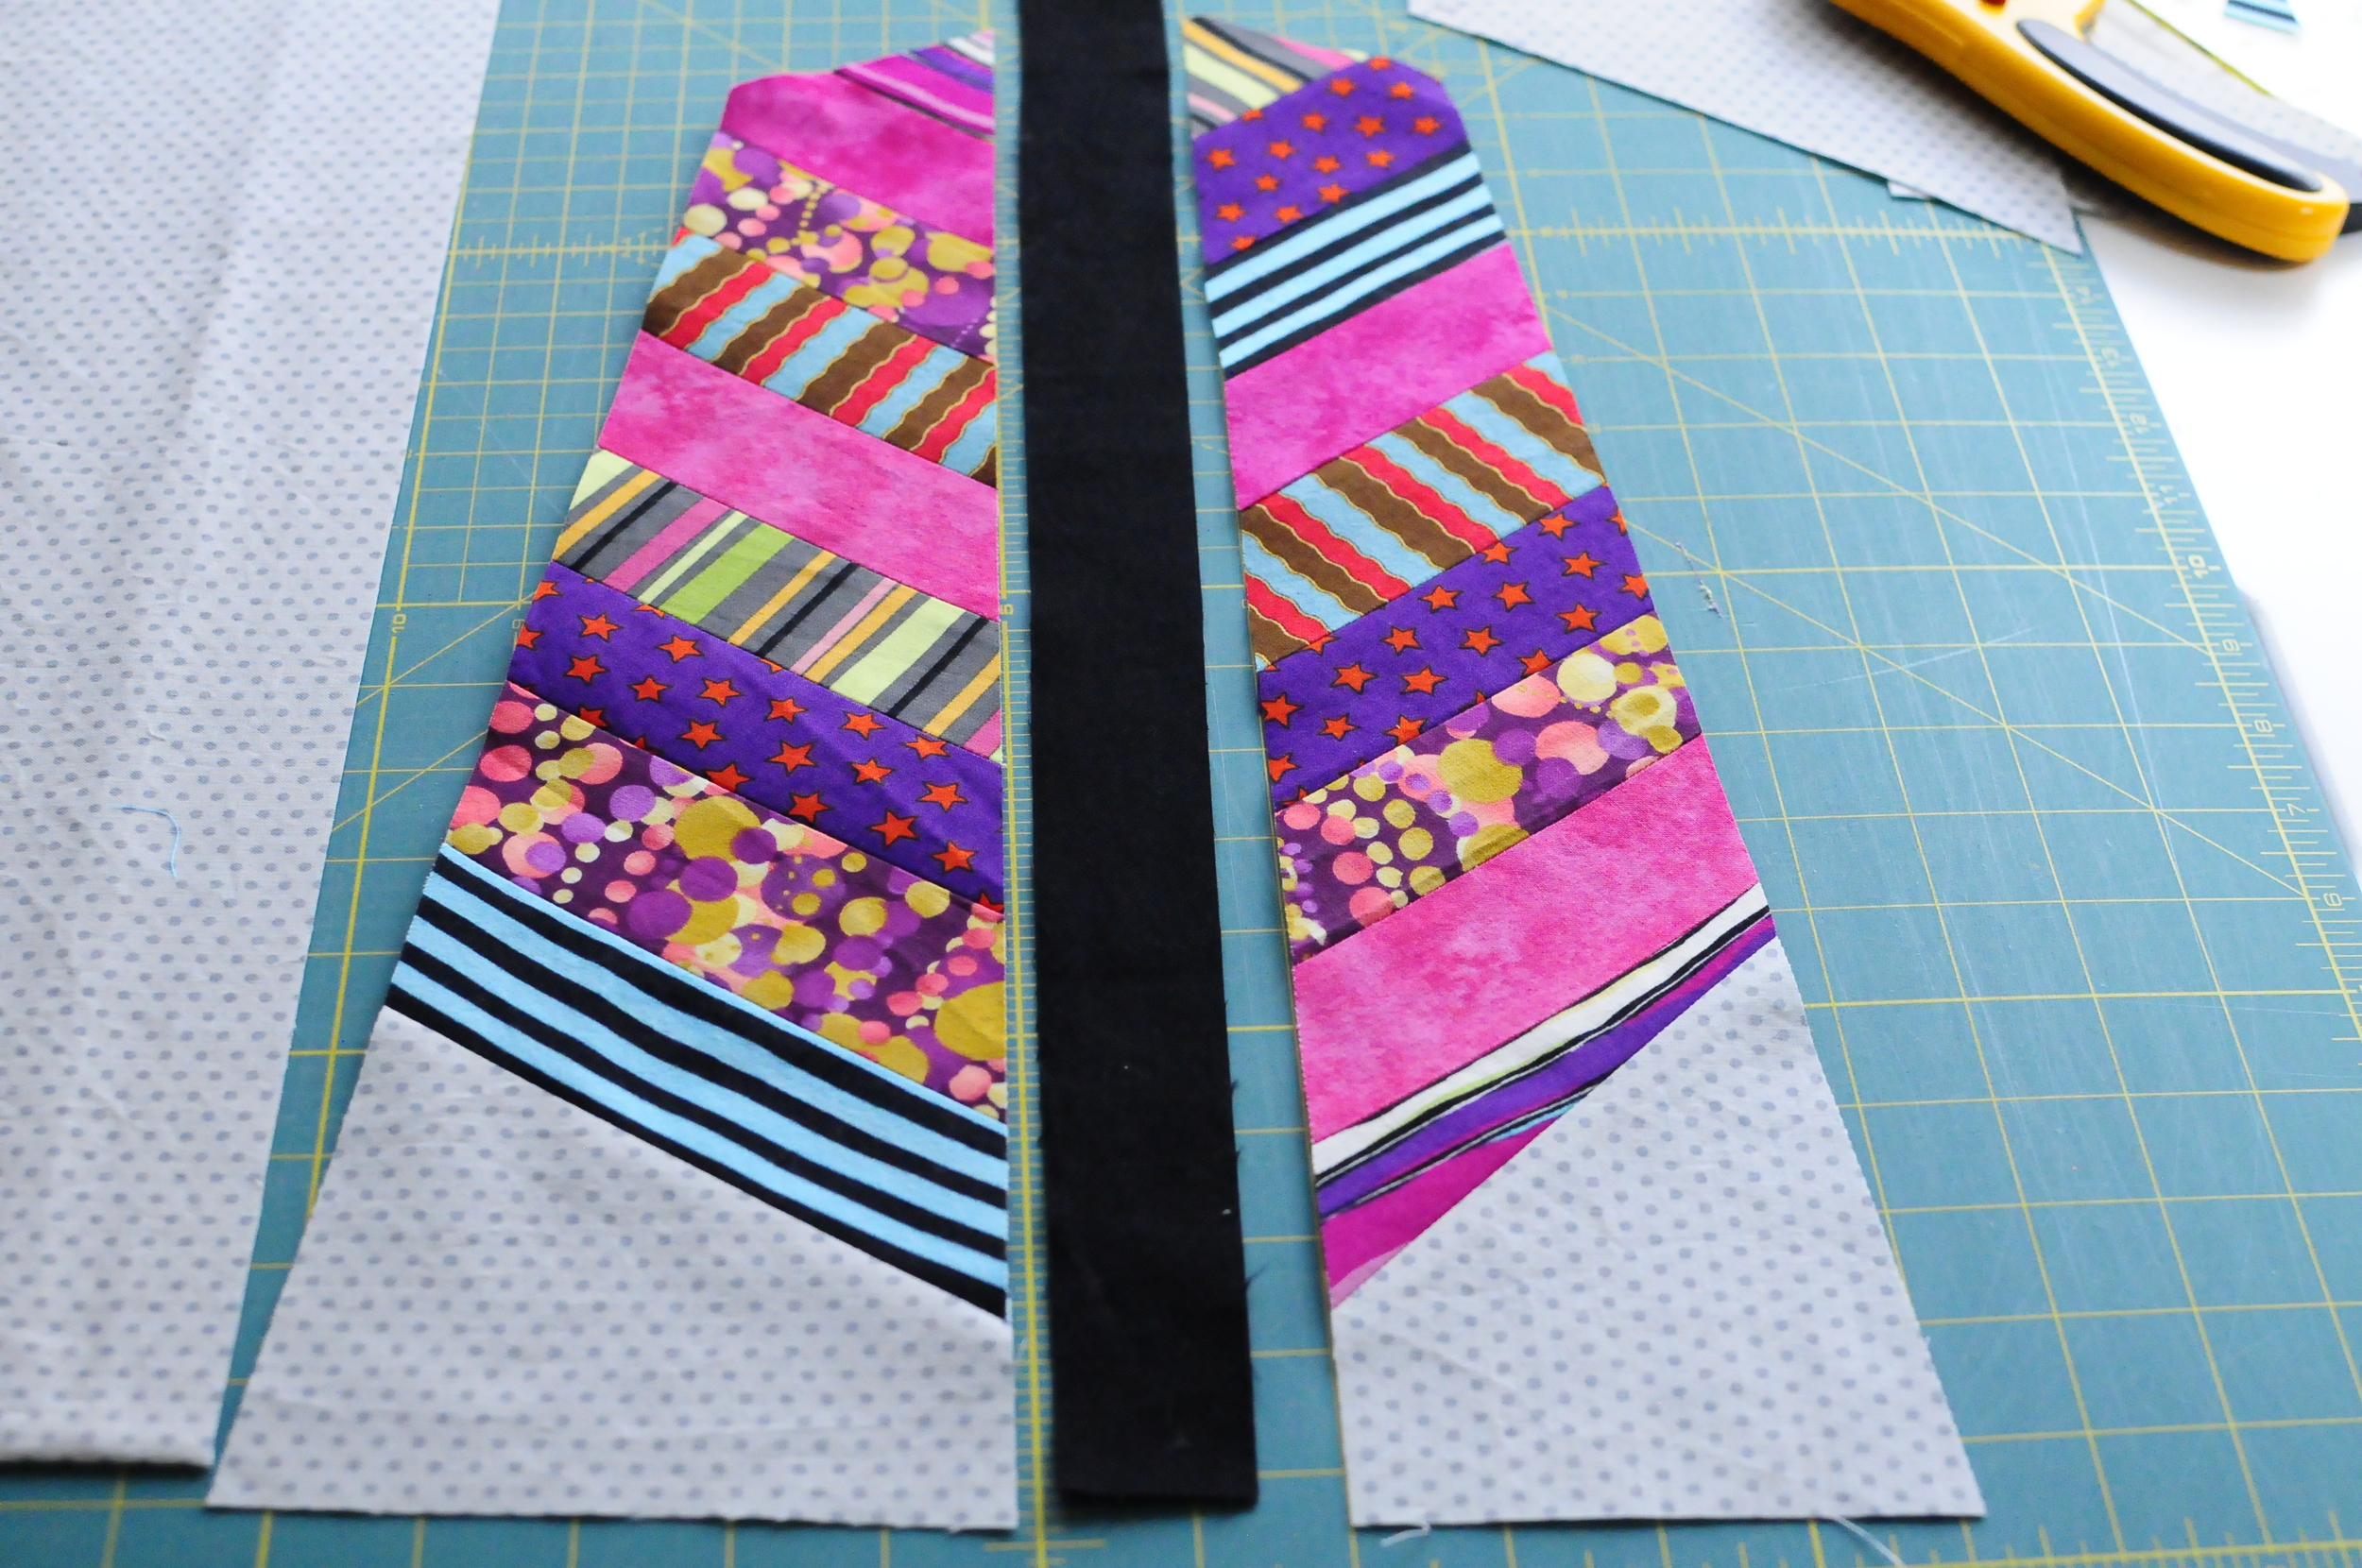
First of all, arrange the colored rectangles as you can see above. You may put the fabrics in any order you wish. Notice that in each section the rectangles are offset to the right or to the left. It's really important to make sure they stay that way as you sew, although you'll notice the sequence of my fabrics got mixed up and it doesn't matter.

Above you can see that both sides of the feather are sewn together. The offsets are about 3/4" to 1". Sew both sides of the feather vane this way, but remember to offset one set to the right and one set to the left.

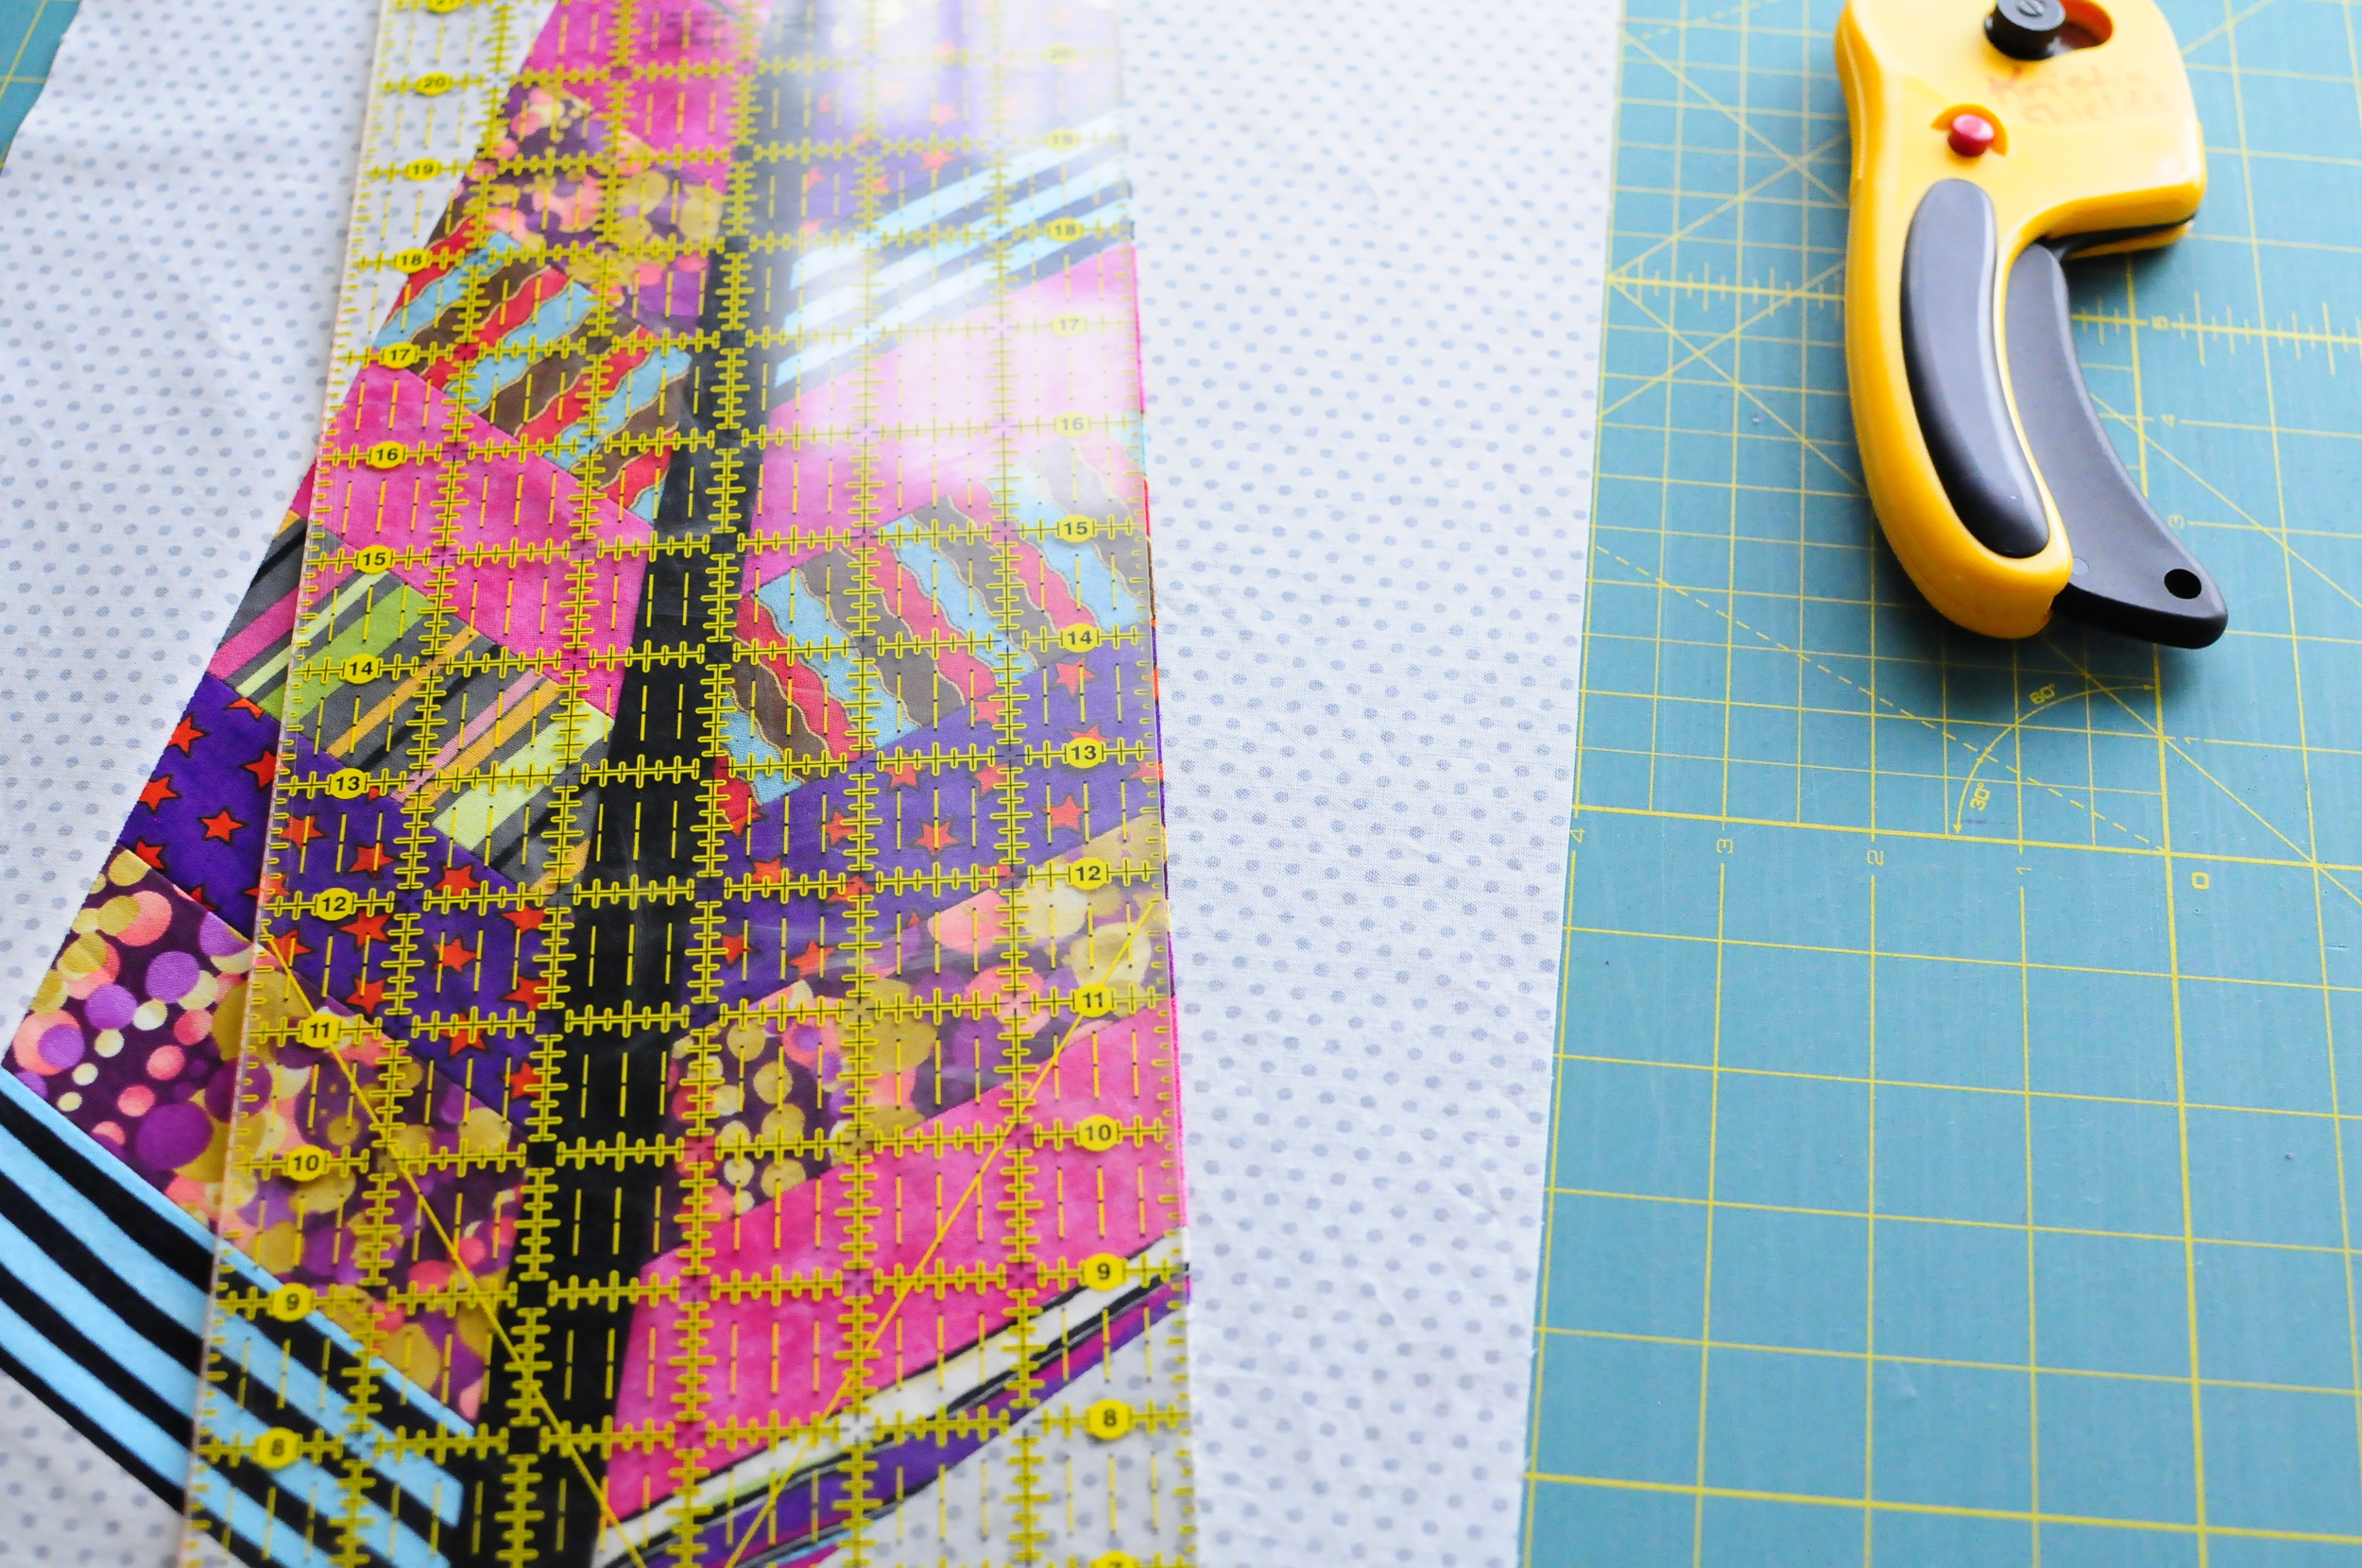
Now you'll use a long ruler to trim off those points. First cut the middle part (the part that will be attached to the black feather shaft. Then trim the outer edges and top points. Notice that the outer angle is wider at the bottom and more narrow at the top.

Notice that the feather vane on both sides is wider at the bottom and more narrow at the top. You should also cut the taper for the top of the feather so that both of the vane sections look complete.

Above you can see all the parts of this puzzle. There are two ways to deal with the squares. You can cut them corner to corner as you see in these photos above and below.


Above you can see how the triangles will be used. The larger ones are used on the bottom of the feather, the smaller ones at the top.

It's time to sew the bottom triangles on to the vane. Notice that the angle of the background triangle and the angle of the feather base are not the same.

In this case I decided to trim the feather vane angle to match the background triangle angle.

Above you can see the other option which works better if you have a solid fabric for your background. You can cut the larger square into these offset "triangle" shapes. If you do this, you are not wasting fabric on the point that would have stuck out on the right side of the bottom triangle. However, if you are using a print the other half (top grey piece) wouldn't be usable on this feather. If this was a solid grey, I could just turn it over to use on the other half of the feather vane.

Above you can see that both sides of the vane have the background triangles attached.

Now it's time to trim off the extra fabric and straighten up the middle edges of the feather vanes.

Trimmed and looking good! Here I'm also trimming the outer side of the vane.

Ooopsy! I didn't quite get the background piece on properly, so my angle doesn't work here. See below for the fix.

Luckily, this is improv and the exact angle of my feather isn't at all important! I can adjust my ruler just enough to trim off a skinny bit that goes all the way from the top to the bottom.
So, you can see the feather vanes all ready to add the shaft. Please note, I have not added the top background triangles yet!

Here I've flipped the first vane onto the shaft, pinned it and am sewing. You'll probably want to use pins for any sewing now that includes bias edges.

Okay, so the left side is sewn to the shaft. How to add the right side?

When adding the second side, it's best to try to make your shaft taper a bit- wider at the bottom and narrower at the top. Don't trim the angle before sewing. Just lay your second vane on top of the shaft so that it angles a bit toward the top. Sew first, check to make sure you did it right, then trim off the extra.

Here I'm trimming the extra fabric from the seam allowance.

Now the top needs another trim! Just keep the angles you've already cut to the vanes and continue it over the shaft.

Top trimmed. Now, get the small background square. You can cut this one from corner to corner and use the triangles as you see here to fill out the top.

The first small triangle sewn to the top of the feather.

Here the angle is trimmed for the next seam (the one for the left side of the top of the feather).

Line up your other triangle and flip and sew.

Ta-da! You're almost done!

Trim up the sides of the feather. Again, you may have to trim some extra away to get a straight line all the way from the top of the feather to the bottom, but you'll be maintaining an angle to the outside of the feather.

Above you can see that the middle section is complete if a little wonky on the top and bottom edges. Don't worry about those wonky edges just yet. Right now you need to figure out how to add the sides on.

Whenever I want to cut an improv angle, but still keep my block on the straight of grain, I will use this technique. Always place the pieces FACE UP when doing this technique. Place left side background piece on your mat with the left edge lined up with a line on the mat. Place the middle feather section so that it remains fairly straight up and down, but also so that it overlaps completely the side background piece all the way from the top to the bottom.

Lay the ruler on the background fabric and butt it up against the edge of the middle section. Cut that angle, then flip and sew (again, pins are a good idea on these bias edges).

Now, one more section to sew on. Do that same thing: line the background piece FACE UP up with a line on the mat, over lap the feather section FACE UP, and trim the angle.
Flip and sew this piece and press.

Now it just needs "squaring up"!

Don't worry about trimming to any particular size. Just trim the edges to be straight with 90 degree corners.

Hey, it looks great! I love that there are no paper piecing or patterns needed. Just use your brains and a little improv know-how and you are set! Not only that, but you are free to adjust as you go. COMQG members should just do this basic feather for our guild charity quilt, but if you want to play with your own fabric, here are some ideas you could try:
- make one feather vane much narrower than the other
- add in some gentle curves (to the shaft and/or to the feather edges)
- piece some of the colored feather sections from smaller pieces to add interest
- piece some jagged bits of background into the edges of the feather vane to show a more ragged edge

Above are the leftovers from this block. I can never leave well enough alone, so I transformed them into

this! The block on the left could certainly be used on the back of this quilt. I will keep them with this project until I decide if I'm going to use them. If not, they can go directly to the orphan block basket.
I hope you find this tutorial useful! Please let me know if anything is not clear and feel free to share!